> ## Documentation Index
> Fetch the complete documentation index at: https://docs.rallied.ai/llms.txt
> Use this file to discover all available pages before exploring further.
# HaloPSA
> Connect HaloPSA to Rallied
## Overview
The HaloPSA integration is a three-part setup that runs in parallel between the **HaloPSA admin UI** and the **Rallied dashboard**. Keep both tabs open while you work through it.
1. **In HaloPSA** — create a dedicated API agent, register an Application against that agent, and copy the Client ID + Client Secret.
2. **In Rallied** — open the HaloPSA integration form, paste the credentials, and save.
3. **In Rallied (post-connect)** — select which HaloPSA clients to import as Rallied clients. Each imported client is provisioned with an agent automatically.
The whole flow takes about 10 minutes.
## Section 1 — Create the API agent in HaloPSA
Use an account with **Administrator** rights.
Go to **Configuration → Teams & Agents → Agents** and click **New**.
Fill in the following (leave other fields at their defaults):
| Field | Value |
| --------------------- | ----------------- |
| Username | `Rallied Agent` |
| Password | *leave blank* |
| Use AD authentication | No |
| Roles | Administrator |
| Is an API-only Agent | **Yes** |
| First Name | `Rallied` |
| Surname | `Agent` |
| Initials | `RA` |
| Default Team | *No Default Team* |
| Work Hours | 24 Hours |
Click **Save**.
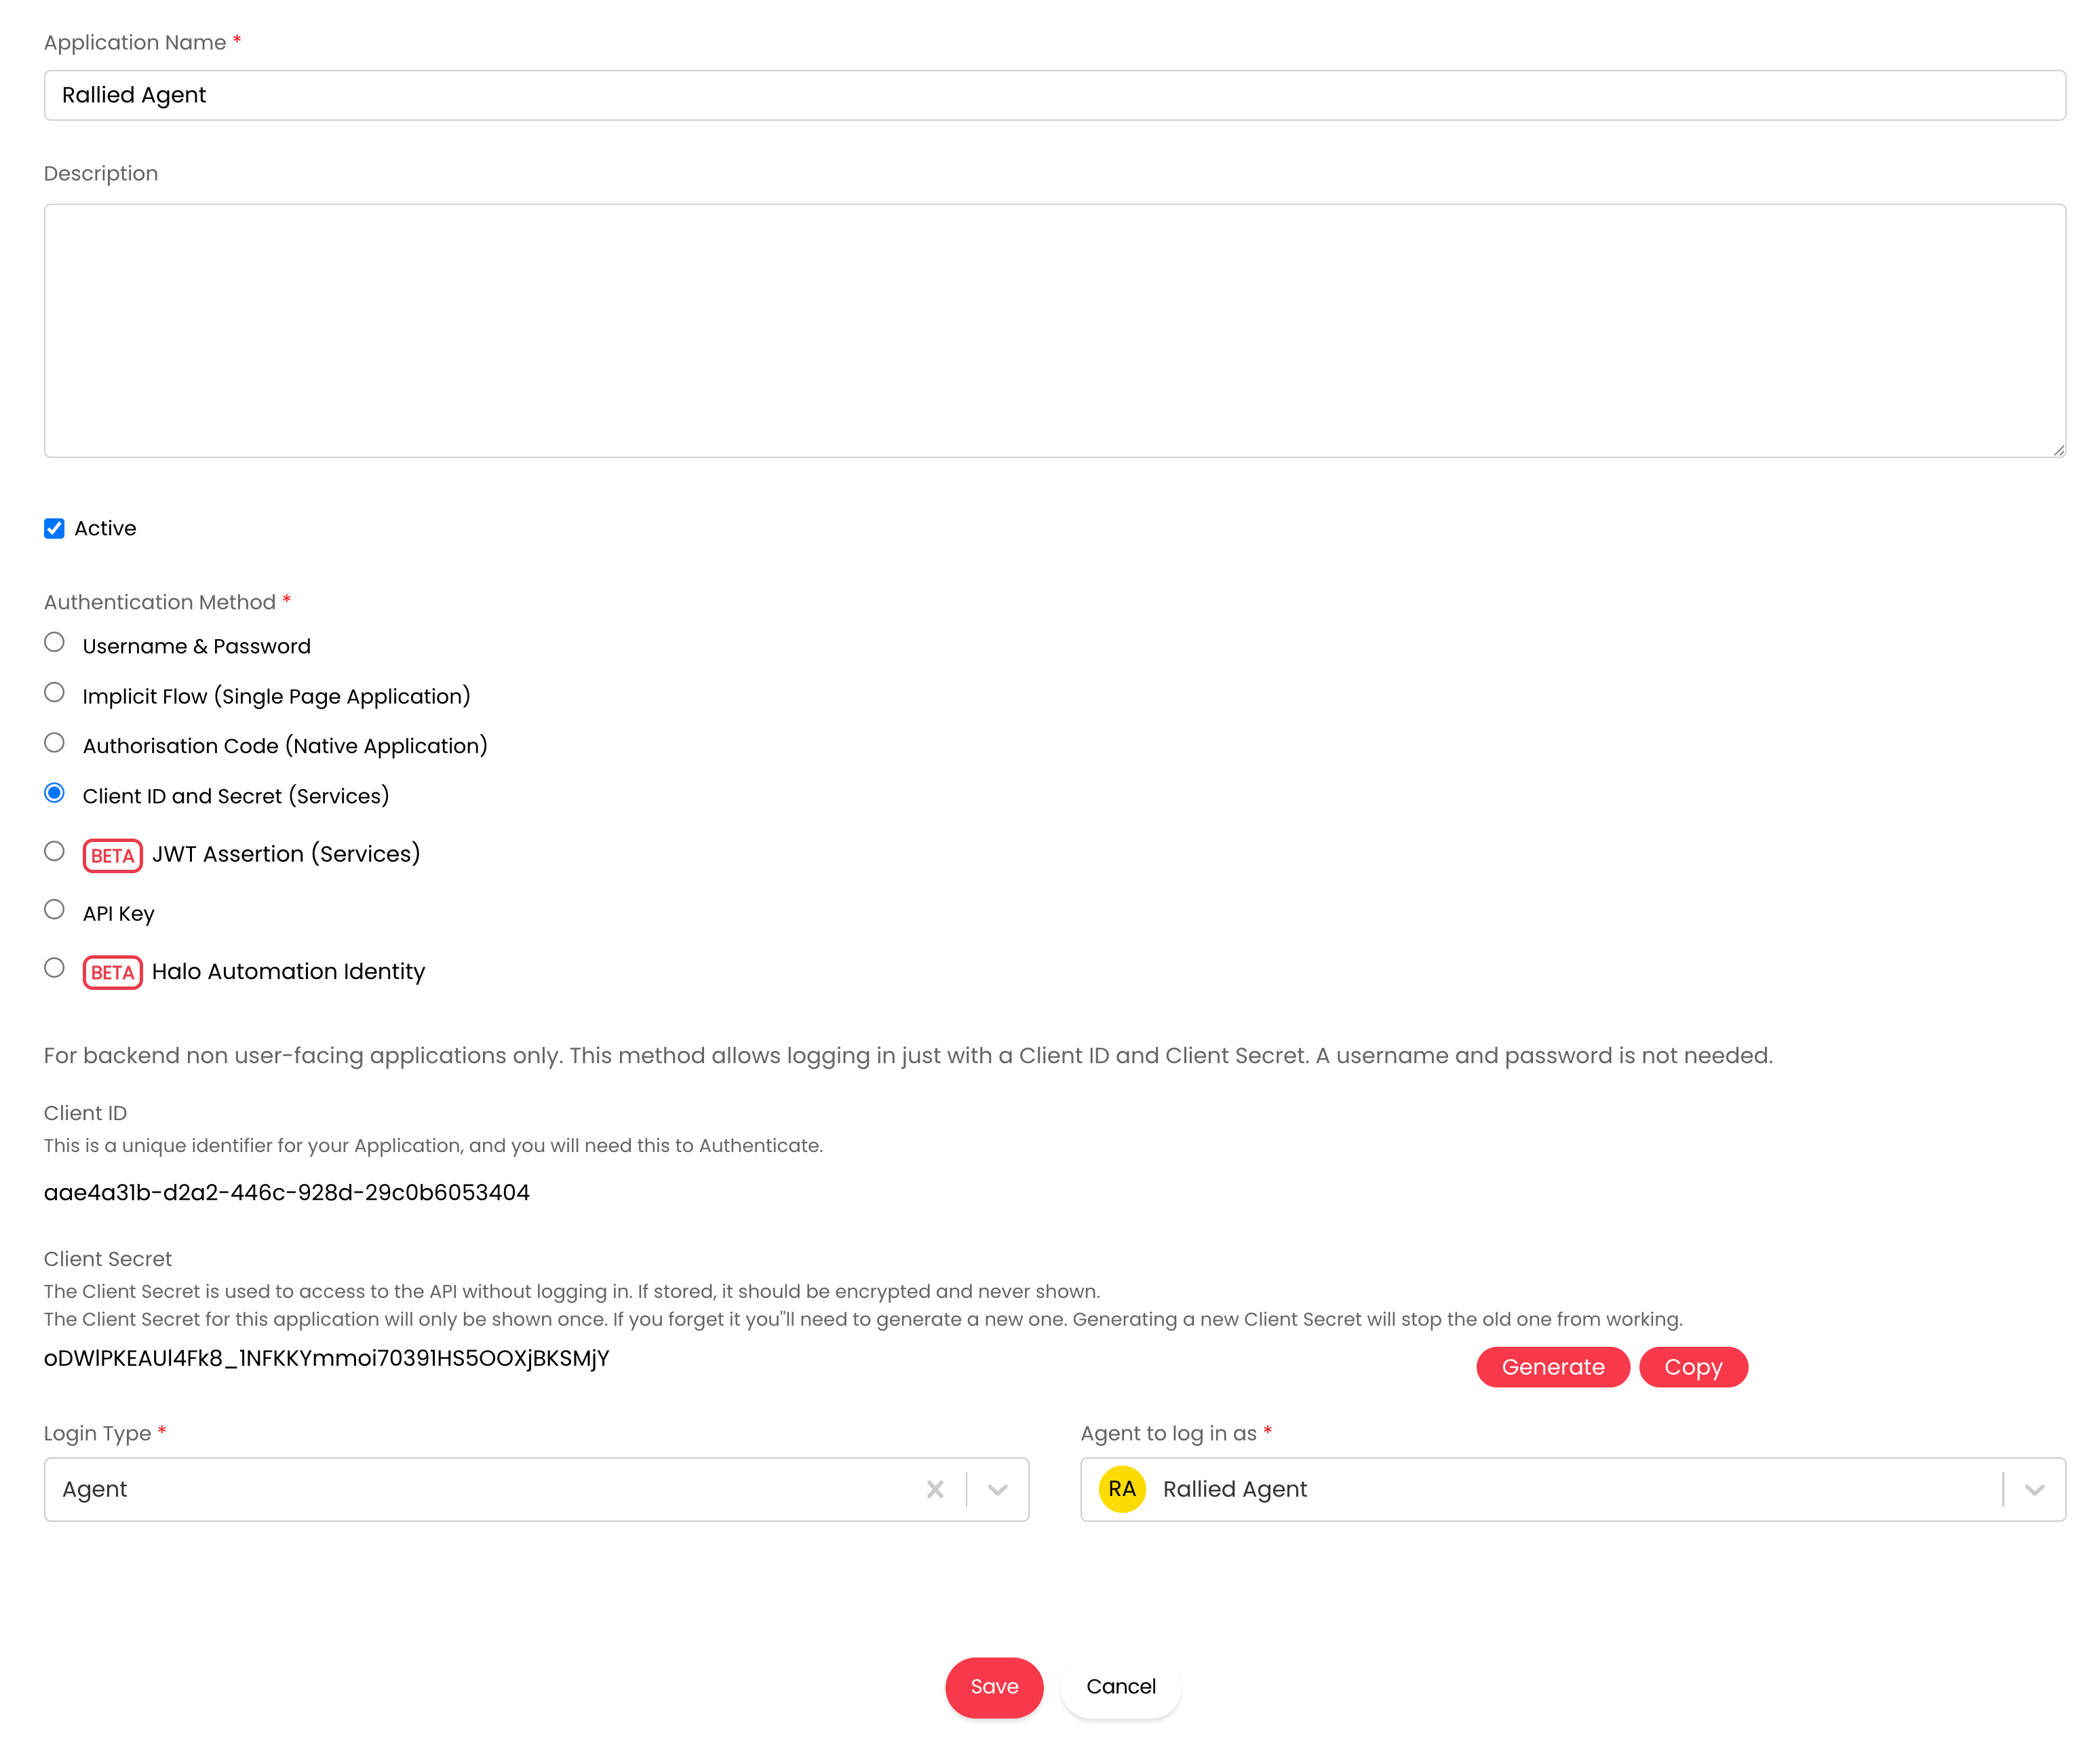 ## Section 2 — Register the Application
The Application is what Rallied uses to call the HaloPSA API.
Go to **Configuration → Integrations → HaloPSA API → Applications → View Applications** and click **New**.
Fill in:
| Field | Value |
| --------------------- | ------------------------------------------ |
| Application Name | `Rallied Agent` |
| Authentication Method | **Client ID and Secret (Services)** |
| Login Type | **Agent** |
| Agent to log in as | `Rallied Agent` (the agent from Section 1) |
HaloPSA generates a **Client ID** and **Client Secret**. Copy both — you'll paste them into Rallied in Section 3. The secret is only displayed once.
## Section 2 — Register the Application
The Application is what Rallied uses to call the HaloPSA API.
Go to **Configuration → Integrations → HaloPSA API → Applications → View Applications** and click **New**.
Fill in:
| Field | Value |
| --------------------- | ------------------------------------------ |
| Application Name | `Rallied Agent` |
| Authentication Method | **Client ID and Secret (Services)** |
| Login Type | **Agent** |
| Agent to log in as | `Rallied Agent` (the agent from Section 1) |
HaloPSA generates a **Client ID** and **Client Secret**. Copy both — you'll paste them into Rallied in Section 3. The secret is only displayed once.
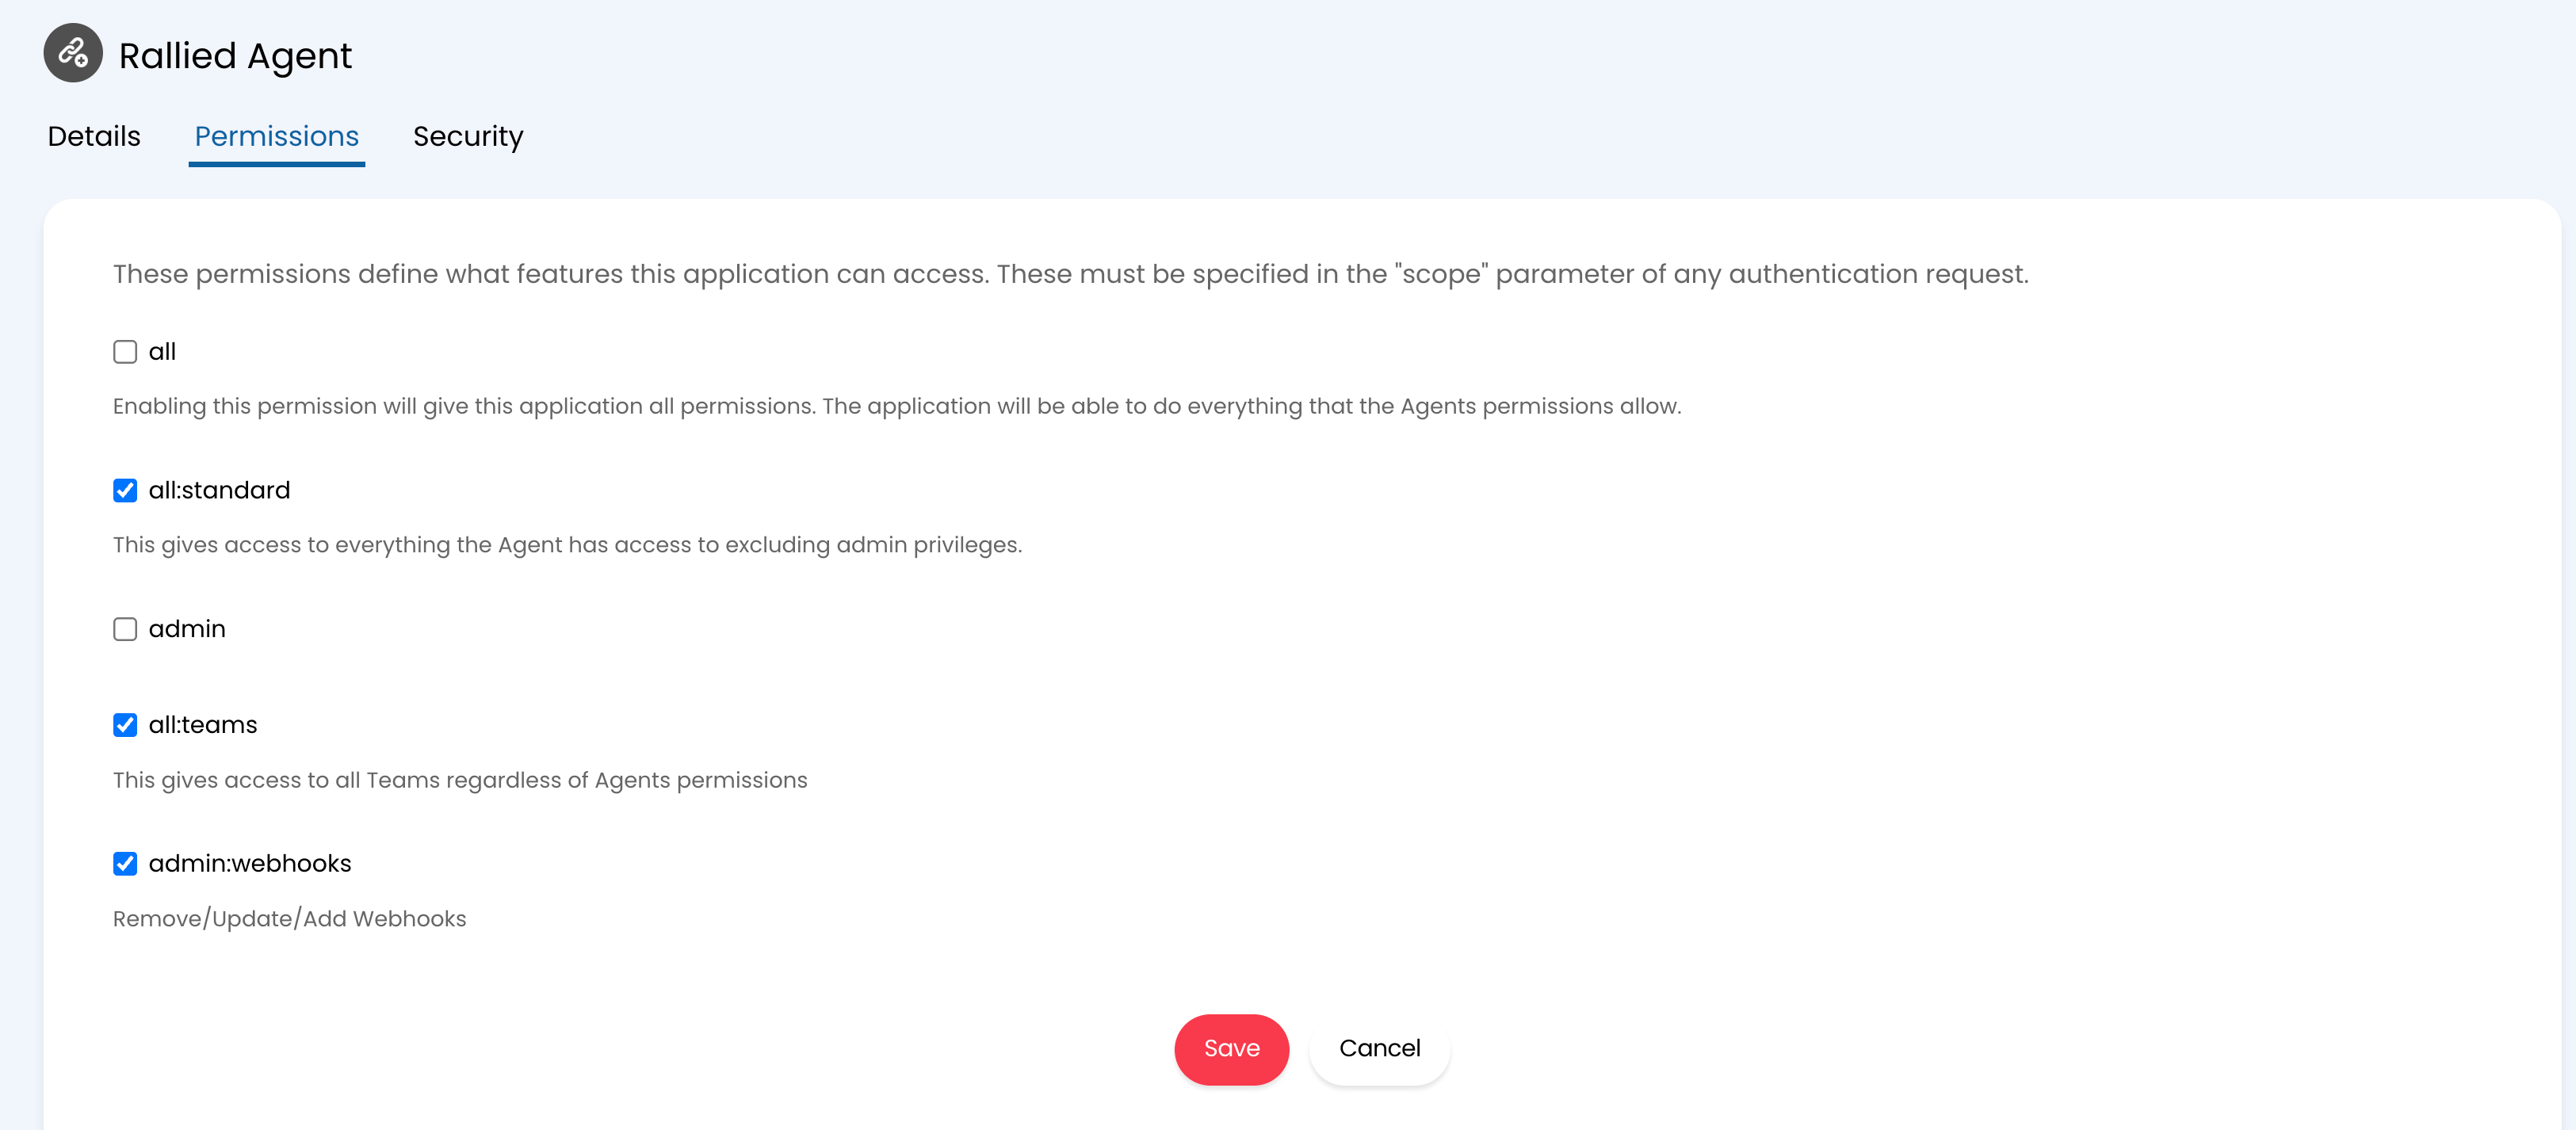
 On the **Permissions** tab, enable the three scopes Rallied needs:
| Permission | Purpose |
| ---------------- | ----------------------------------------------------------------- |
| `all:standard` | Read/write tickets, notes, customers, assets, and users |
| `all:teams` | Access to all Teams regardless of the agent's own team membership |
| `admin:webhooks` | Lets Rallied register and refresh its own webhook automatically |
Leave `all` and `admin` **unchecked** — `all:standard` plus `admin:webhooks` is the least-privileged set that lets the integration work.
On the **Permissions** tab, enable the three scopes Rallied needs:
| Permission | Purpose |
| ---------------- | ----------------------------------------------------------------- |
| `all:standard` | Read/write tickets, notes, customers, assets, and users |
| `all:teams` | Access to all Teams regardless of the agent's own team membership |
| `admin:webhooks` | Lets Rallied register and refresh its own webhook automatically |
Leave `all` and `admin` **unchecked** — `all:standard` plus `admin:webhooks` is the least-privileged set that lets the integration work.
 Click **Save**. Leave the page open — you still need the Client ID and Client Secret in the next section.
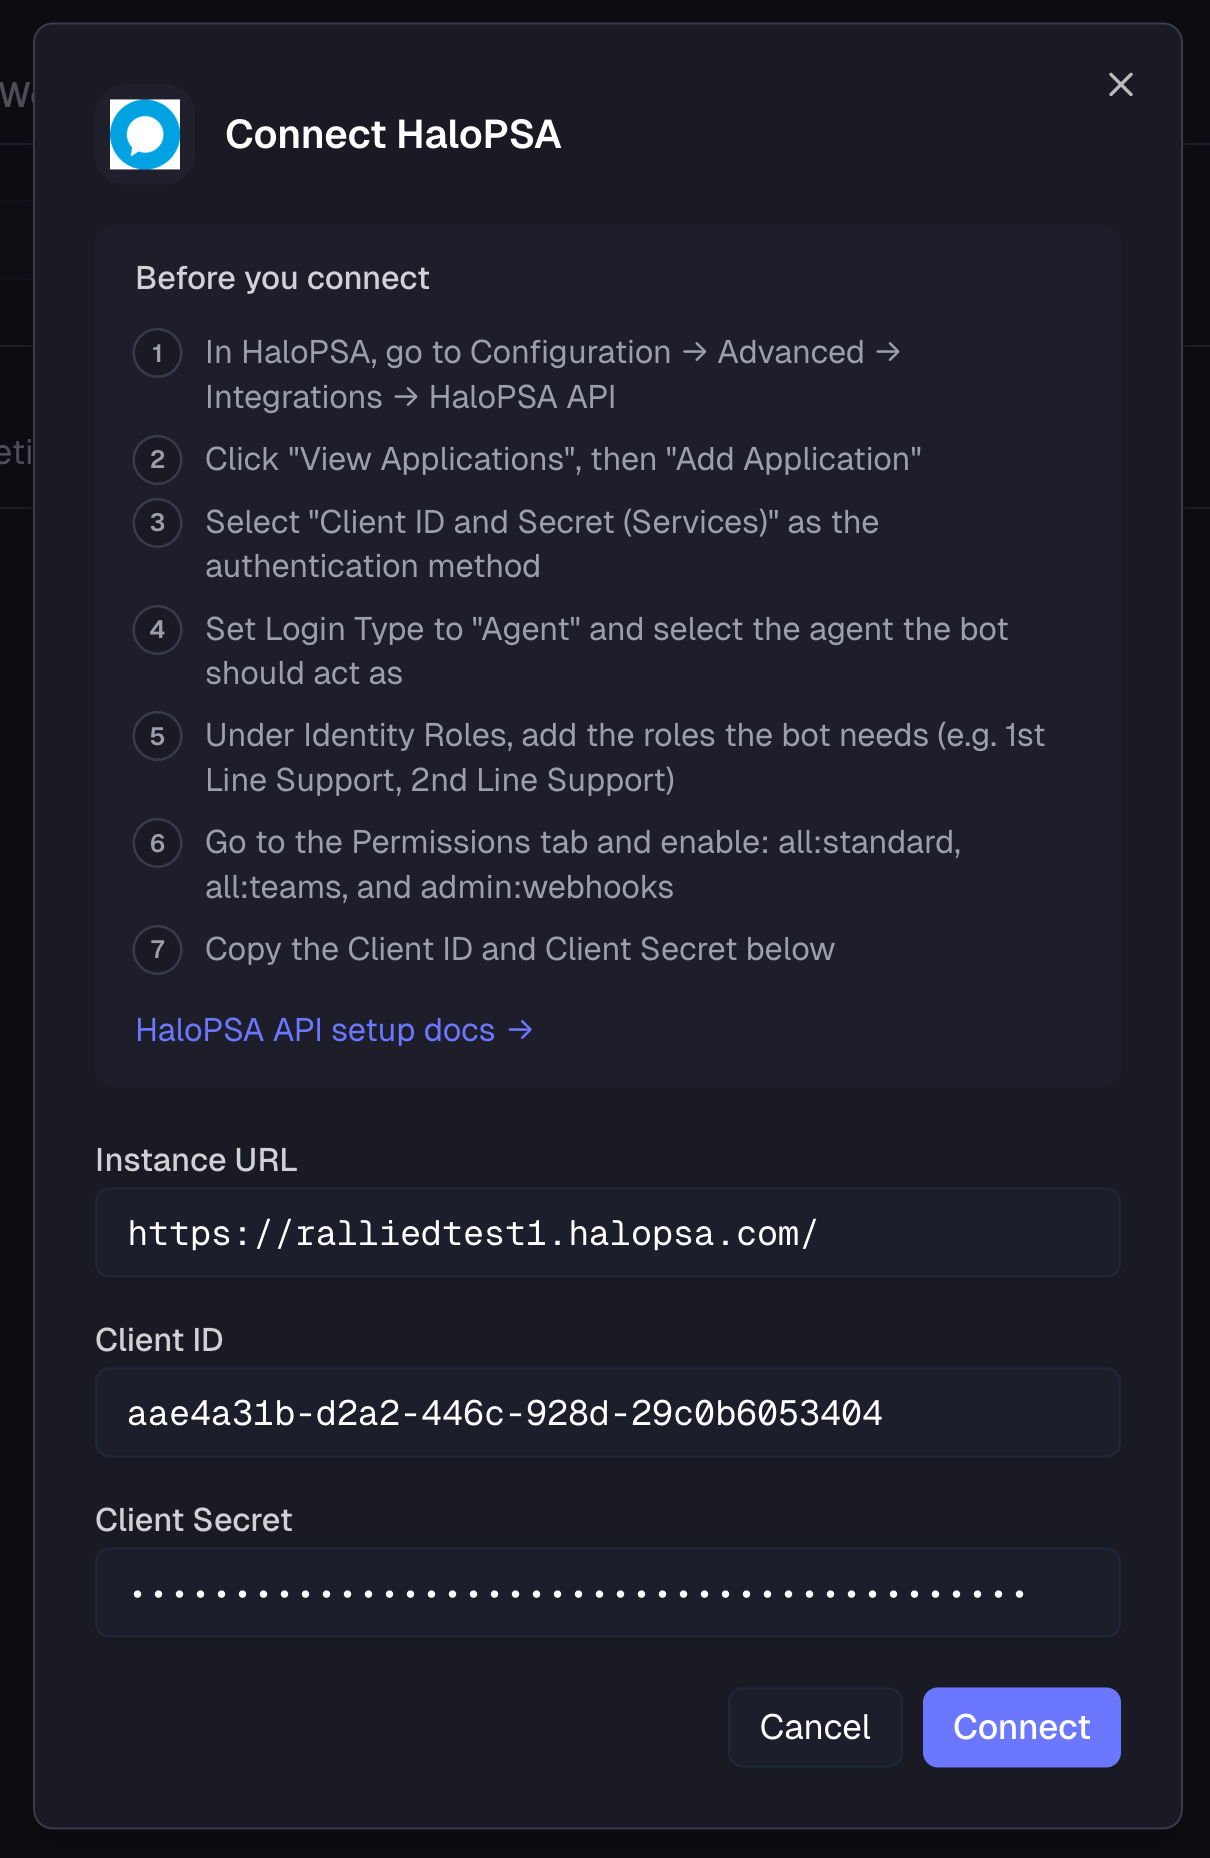
## Section 3 — Connect HaloPSA in Rallied
In the Rallied dashboard, navigate to **MSP Settings → Integrations**.
Find the HaloPSA card and click **Connect**. A credentials form appears.
Fill in:
* **Instance URL** — your HaloPSA tenant URL, e.g. `https://yourcompany.halopsa.com` (no trailing slash; HTTPS required)
* **Client ID** — from the Application in Section 2
* **Client Secret** — from the Application in Section 2
Click **Save**. Rallied validates the connection. If the credentials are wrong, you'll see an inline error — re-check the values and re-save.
Click **Save**. Leave the page open — you still need the Client ID and Client Secret in the next section.
## Section 3 — Connect HaloPSA in Rallied
In the Rallied dashboard, navigate to **MSP Settings → Integrations**.
Find the HaloPSA card and click **Connect**. A credentials form appears.
Fill in:
* **Instance URL** — your HaloPSA tenant URL, e.g. `https://yourcompany.halopsa.com` (no trailing slash; HTTPS required)
* **Client ID** — from the Application in Section 2
* **Client Secret** — from the Application in Section 2
Click **Save**. Rallied validates the connection. If the credentials are wrong, you'll see an inline error — re-check the values and re-save.
 After saving, the **Select clients to import** post-connect step opens. Pick which HaloPSA clients you want to manage with Rallied. Each one is imported into the dashboard with an agent provisioned automatically.
Rallied registers the webhook in HaloPSA for you and subscribes it to new and updated ticket events. You don't need to add the webhook or notifications manually.
## How incoming tickets work
When a new or updated ticket arrives, Rallied matches the ticket's **Client (Customer)** to a Rallied client and wakes that client's agent with the ticket context preloaded — subject, requester, priority, prior notes — and the agent begins diagnosing.
If the learning pipeline has generated active workflows for your MSP and the ticket content matches a known pattern, the relevant workflow is injected into the agent's context to guide resolution.
### Sensitive tickets and identity verification
When the ticket is classified as sensitive — for example, a password or MFA reset — and you have a verification provider like [Traceless](/integrations/traceless) connected, Rallied dispatches an identity verification challenge to the requester before the agent starts work. The agent is paused until the verification resolves, and an internal note is posted on the ticket with the outcome.
## Approval channel
When the agent's plan includes a step that requires technician approval, it creates a HaloPSA **action** on the ticket describing the proposed steps. Technicians see the action in HaloPSA and reply to approve or deny.
The agent reads replies on the same ticket, classifies the intent (approve, deny, or neutral), and proceeds accordingly. Neutral replies such as routine status updates are forwarded to the agent as a normal message without affecting the approval.
Only the ticket's **assigned agent** is treated as a valid approver — replies from anyone else are ignored for approval purposes.
## Voice Agent
If you've enabled the [Voice Agent](/dashboard/voice-agent), HaloPSA is one of the supported PSAs for caller matching and ticket creation. The voice agent searches HaloPSA users as the caller speaks their name, creates a new ticket on the matched user's client, and posts the call transcript as the first ticket note.
## Testing the end-to-end setup
Click **New Ticket** at the top of any HaloPSA page. Pick any ticket type, assign it to an imported client, and fill in a short subject and description.
Go to **Configuration → Integrations → Webhooks**, open the `Rallied (...)` webhook, and check the **Deliveries** tab. You should see a successful delivery for the new ticket.
In Rallied, open **Activity** (or the imported client's detail page) — the new ticket should appear with the agent's diagnosis already in progress. If the operating mode is **Plan**, the agent posts an internal note with its plan; in **Execute** mode it begins executing read-only steps and requests approval for write actions.
If the ticket doesn't appear in Rallied, double-check:
* The Instance URL has no trailing slash and uses HTTPS
* The Client Secret hasn't been regenerated since you saved it in Rallied
* The client linked to the test ticket was imported in Section 3
## Policies
You can adjust HaloPSA tool policies from **MSP Settings → Integrations** (open the HaloPSA detail page
After saving, the **Select clients to import** post-connect step opens. Pick which HaloPSA clients you want to manage with Rallied. Each one is imported into the dashboard with an agent provisioned automatically.
Rallied registers the webhook in HaloPSA for you and subscribes it to new and updated ticket events. You don't need to add the webhook or notifications manually.
## How incoming tickets work
When a new or updated ticket arrives, Rallied matches the ticket's **Client (Customer)** to a Rallied client and wakes that client's agent with the ticket context preloaded — subject, requester, priority, prior notes — and the agent begins diagnosing.
If the learning pipeline has generated active workflows for your MSP and the ticket content matches a known pattern, the relevant workflow is injected into the agent's context to guide resolution.
### Sensitive tickets and identity verification
When the ticket is classified as sensitive — for example, a password or MFA reset — and you have a verification provider like [Traceless](/integrations/traceless) connected, Rallied dispatches an identity verification challenge to the requester before the agent starts work. The agent is paused until the verification resolves, and an internal note is posted on the ticket with the outcome.
## Approval channel
When the agent's plan includes a step that requires technician approval, it creates a HaloPSA **action** on the ticket describing the proposed steps. Technicians see the action in HaloPSA and reply to approve or deny.
The agent reads replies on the same ticket, classifies the intent (approve, deny, or neutral), and proceeds accordingly. Neutral replies such as routine status updates are forwarded to the agent as a normal message without affecting the approval.
Only the ticket's **assigned agent** is treated as a valid approver — replies from anyone else are ignored for approval purposes.
## Voice Agent
If you've enabled the [Voice Agent](/dashboard/voice-agent), HaloPSA is one of the supported PSAs for caller matching and ticket creation. The voice agent searches HaloPSA users as the caller speaks their name, creates a new ticket on the matched user's client, and posts the call transcript as the first ticket note.
## Testing the end-to-end setup
Click **New Ticket** at the top of any HaloPSA page. Pick any ticket type, assign it to an imported client, and fill in a short subject and description.
Go to **Configuration → Integrations → Webhooks**, open the `Rallied (...)` webhook, and check the **Deliveries** tab. You should see a successful delivery for the new ticket.
In Rallied, open **Activity** (or the imported client's detail page) — the new ticket should appear with the agent's diagnosis already in progress. If the operating mode is **Plan**, the agent posts an internal note with its plan; in **Execute** mode it begins executing read-only steps and requests approval for write actions.
If the ticket doesn't appear in Rallied, double-check:
* The Instance URL has no trailing slash and uses HTTPS
* The Client Secret hasn't been regenerated since you saved it in Rallied
* The client linked to the test ticket was imported in Section 3
## Policies
You can adjust HaloPSA tool policies from **MSP Settings → Integrations** (open the HaloPSA detail page