> ## Documentation Index
> Fetch the complete documentation index at: https://docs.rallied.ai/llms.txt
> Use this file to discover all available pages before exploring further.
# Microsoft 365
> Connect your MSP's Microsoft 365 environment to enable user management, password resets, group administration, and mailbox operations across all customer tenants.
## Overview
The Microsoft 365 integration uses a **multi-tenant app registration** in your MSP's partner tenant to manage customer tenants via GDAP. Once connected, the agent can perform user lifecycle operations, password resets, security checks, group management, and Exchange mailbox operations.
All operations respect your configured tool policies. Write operations (password reset, user creation, group changes) require approval by default.
**Already running [CIPP](https://docs.cipp.app)?** Connect it (Phase 4) and you can skip most of the per-tenant clicking in Phase 3 — grant consent across all your customer tenants in one go, and unlock Exchange tools (distribution groups, shared mailboxes) without having to assign the Exchange Administrator role to the Rallied app in each tenant.
***
## Phase 1: Configure the MSP's Partner Tenant
These steps are performed once in the MSP's own Entra tenant.
### 1. Create an App Registration
1. Sign in to [**entra.microsoft.com**](https://entra.microsoft.com) with your partner tenant admin account
2. Navigate to **Applications → App registrations → + New registration**
3. Fill in:
* **Name** — e.g. `Rallied Integration` (this display name appears in role pickers across all customer tenants — make it recognizable)
* **Supported account types** — select **"Accounts in any organizational directory (Multitenant)"**
* **Redirect URI** — leave blank
4. Click **Register**
Save the **Application (client) ID** and **Directory (tenant) ID** from the Overview page — you'll need both when connecting in Rallied.
### 2. Generate a Client Secret
1. In the app registration, go to **Certificates & secrets → + New client secret**
2. Set a description (e.g. `Rallied production`) and expiration (24 months recommended)
3. Click **Add**
Copy the secret **Value** immediately — it disappears after you navigate away from this page.
### 3. Add API Permissions
Navigate to **API permissions → + Add a permission** and add all of the following as **Application permissions**:
**Microsoft Graph** (under Microsoft APIs → Microsoft Graph):
| Permission | Purpose |
| ----------------------------------- | -------------------------------------- |
| `User.ReadWrite.All` | User management, password resets |
| `Group.ReadWrite.All` | Entra group management |
| `Directory.Read.All` | Read licenses, SKUs, organization info |
| `UserAuthenticationMethod.Read.All` | MFA status checks |
| `IdentityRiskyUser.Read.All` | Risky user detection |
**Exchange Online** (under APIs my organization uses → Office 365 Exchange Online):
| Permission | Purpose |
| ---------------------- | ---------------------------------------------------------- |
| `Exchange.ManageAsApp` | Distribution groups, shared mailboxes, mailbox permissions |
### 4. Grant Admin Consent
Still on the **API permissions** page:
1. Click **Grant admin consent for \[your organization]** at the top
2. Confirm in the dialog
3. Verify the **Status** column shows a green checkmark ("Granted") for every permission
Granting consent requires **Global Administrator** or **Privileged Role Administrator** in the partner tenant. Cloud Application Administrator is not sufficient for Microsoft Graph application permissions.
### 5. Add to Admin Agents Group (Partner Center)
1. Sign in to [**partner.microsoft.com**](https://partner.microsoft.com)
2. Navigate to **Settings → Account settings → User management**
3. Select the **Admin Agents** security group
4. Click **+ Add member** (or "Assign to role" depending on UI version)
5. Search for the app's service principal by display name (e.g. `Rallied Integration`)
6. Add it
This step enables the app to act on behalf of GDAP-delegated customer tenants via Partner Center.
***
## Phase 2: Connect in Rallied
1. In the Rallied dashboard, go to the MSP's page → **Integrations → Microsoft 365**
2. Click **Connect**
3. Enter:
* **Application (Client) ID** — from Phase 1, Step 1
* **Client Secret** — from Phase 1, Step 2
* **Partner Tenant ID** — from Phase 1, Step 1
4. Click **Submit**
Rallied validates credentials by acquiring an app-only token from Microsoft Entra ID. If successful, the integration appears as connected.
***
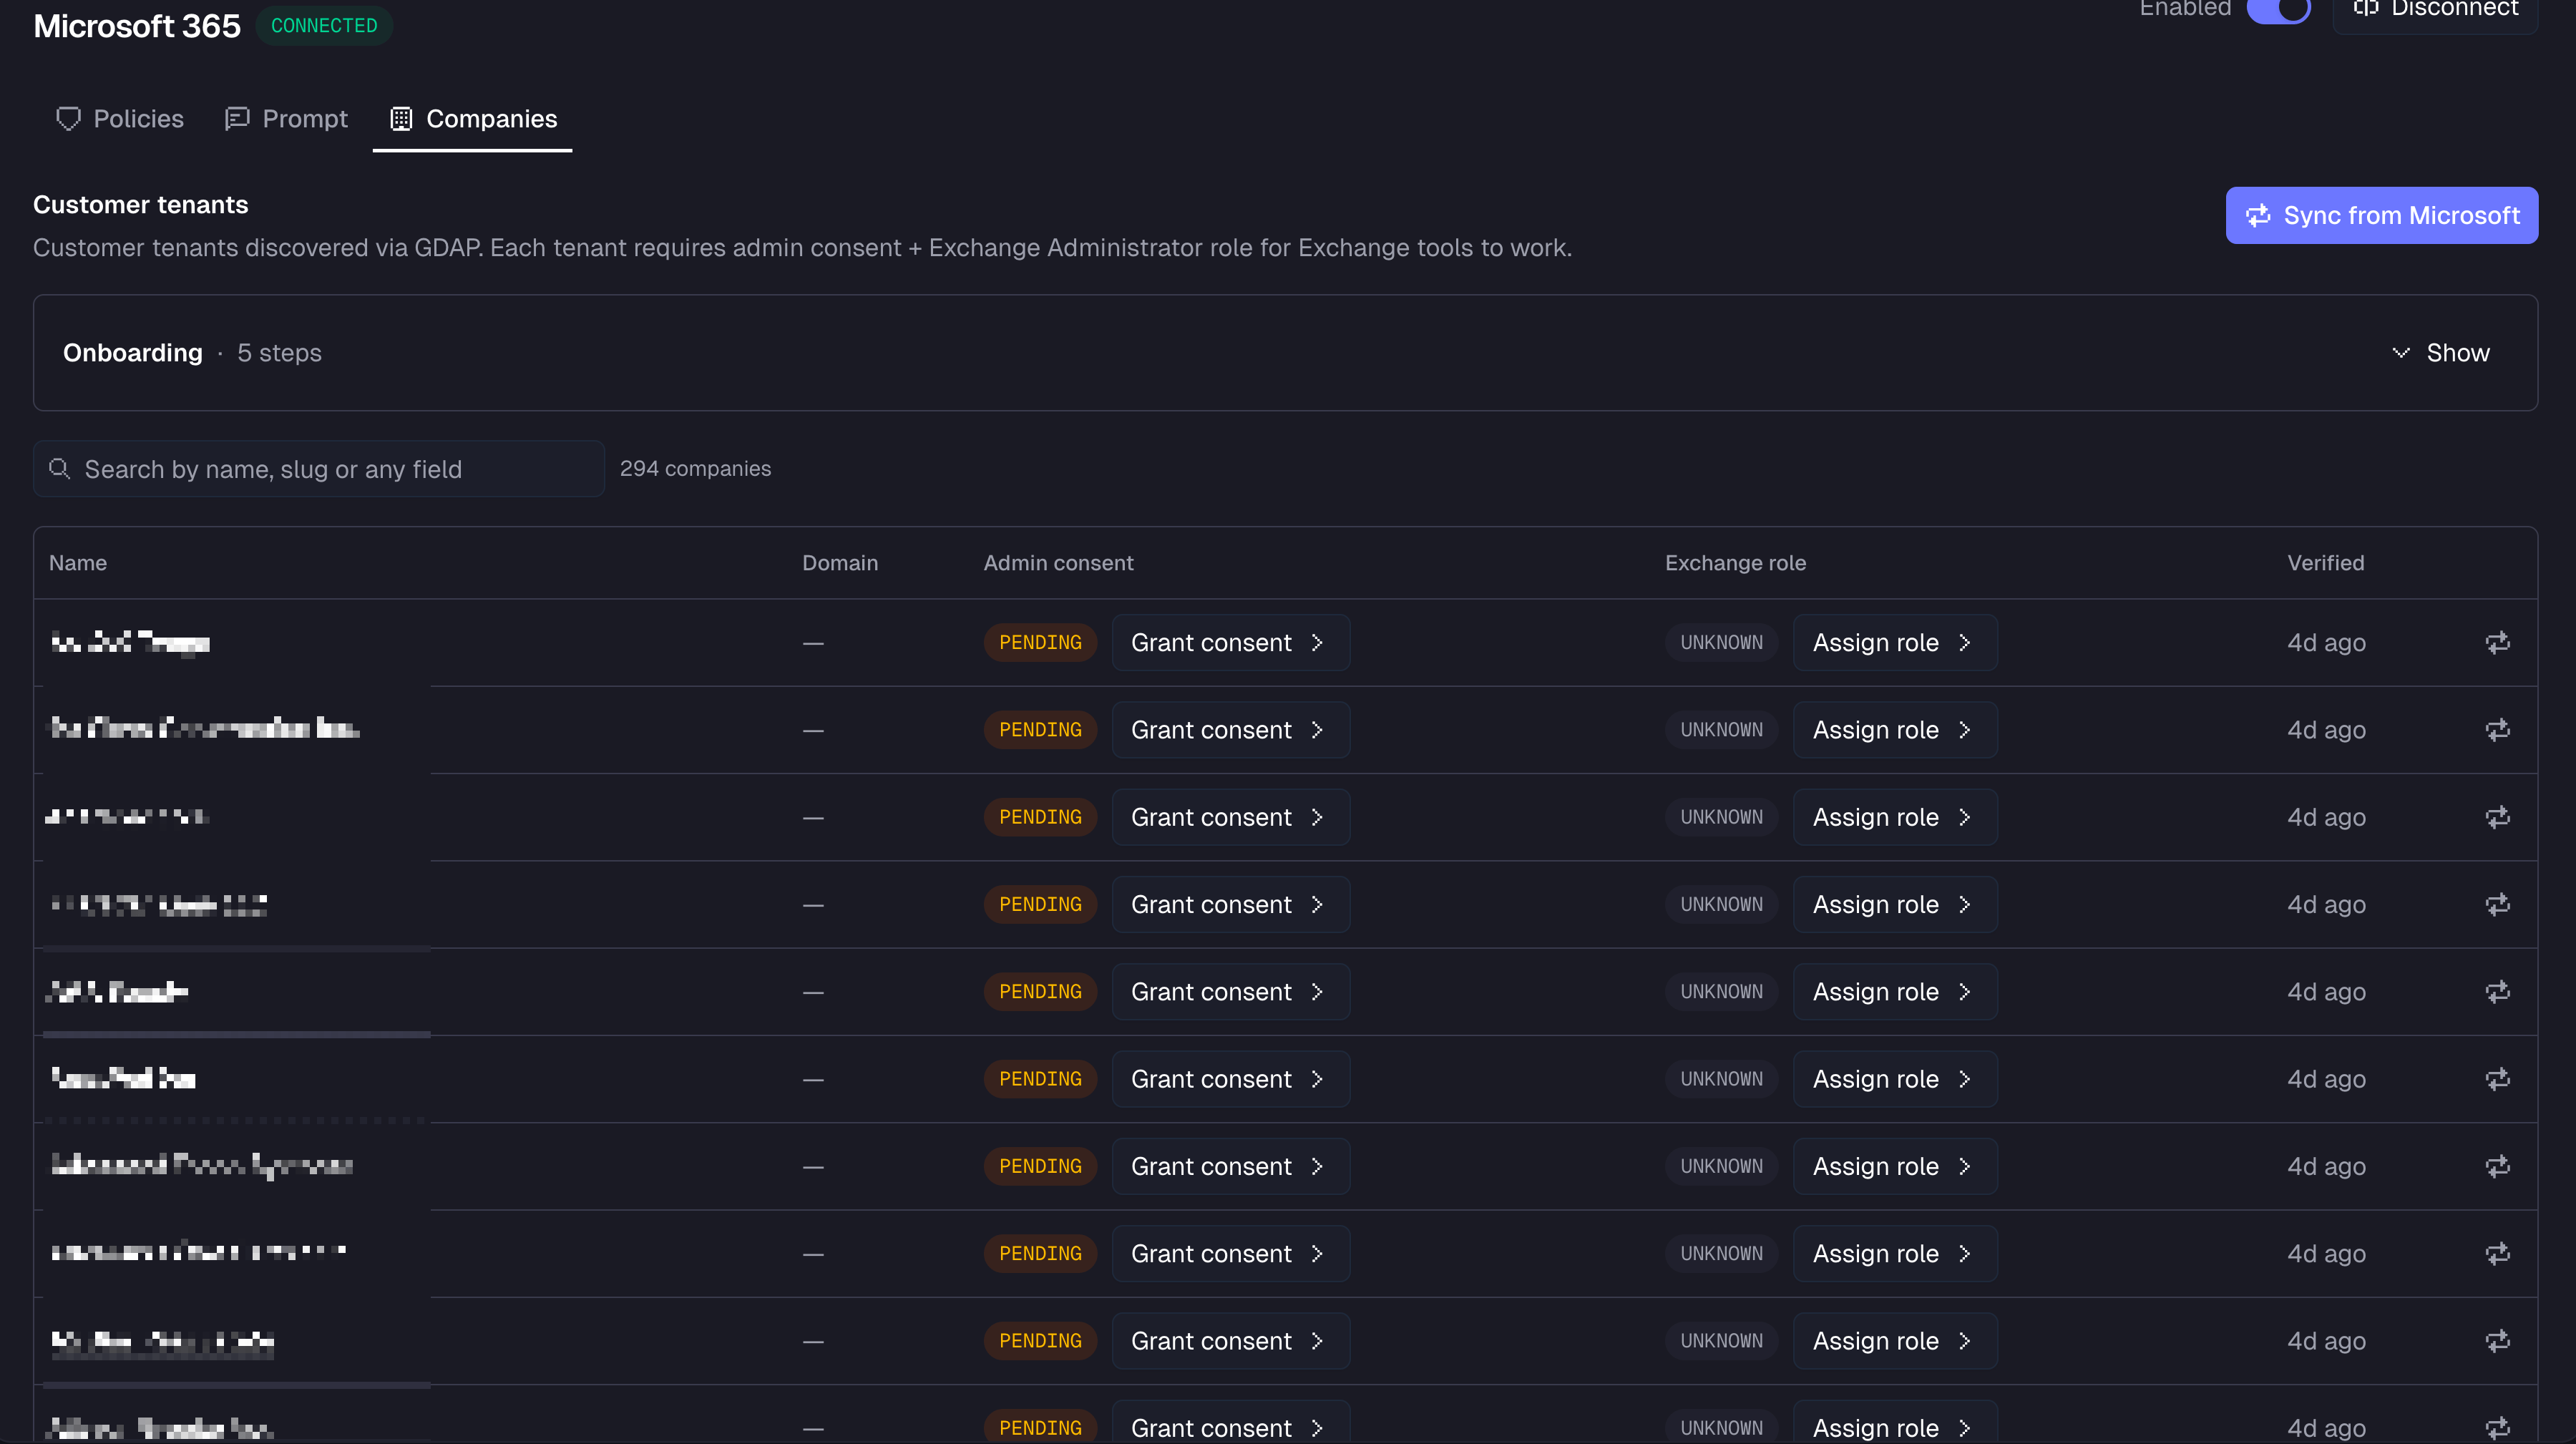
## Phase 3: Onboard Customer Tenants
The steps below must be completed for **every** customer tenant. Admin consent and role assignments do not propagate between tenants.
 ### Who can perform these steps
* A **Global Administrator** (or **Privileged Role Administrator**) of the customer tenant, OR
* The MSP acting via **GDAP**, if the relationship includes Global Administrator or Privileged Role Administrator
Cloud Application Administrator and Application Administrator are **not sufficient** — Microsoft restricts consent for Graph application permissions to Global Admin or PRA ([source](https://learn.microsoft.com/en-us/entra/identity/enterprise-apps/user-admin-consent-overview)).
### Step 1: Sync from Microsoft
Click **Sync** in the Companies tab to discover all customer tenants in your GDAP relationships. New tenants appear in the table with status **Pending**.
### Step 2: Grant Admin Consent
For each tenant where Consent shows **Pending**:
1. Click **Grant admin consent** on that row
2. Sign in as a Global Administrator (or PRA) of the customer tenant — or use GDAP if your relationship includes those roles
3. Approve the permissions in the Microsoft consent dialog
### Step 3: Assign the Exchange Administrator Role
For each tenant where Exchange shows **Pending**:
1. Click **Assign Exchange Admin role** on that row (opens Entra for that tenant)
2. In Entra, go to **Identity → Roles & admins**
3. Click the **Exchange Administrator** role
4. Click **Add assignment** and add the Rallied app's service principal
This step is only required if you want the agent to manage distribution groups, shared mailboxes, and mailbox permissions. Graph-only operations (user management, groups, password reset) work without it.
**Already running [CIPP](https://docs.cipp.app)?** Connect it under [Phase 4](#phase-4-optional-connect-cipp) and you can skip this step. The agent will pick up distribution groups and shared mailboxes through CIPP instead, no per-tenant role assignment needed. Those tenants show **Exchange: working (cipp)** on the Companies tab.
### Step 4: Wait for Propagation
Microsoft caches role permissions for **30 minutes to 2 hours**. Tools may return 403 during this window even when the setup is correct.
### Step 5: Re-verify
Click **Re-verify** on the row to refresh status. When both badges turn green, the tenant is ready — confirm by asking the agent to list users or distribution groups for that company.
**Done!** The tenant is fully onboarded. The agent can now manage users, groups, passwords, and mailboxes for this customer.
***
## Phase 4 (optional): Connect CIPP
If your MSP already runs [CIPP](https://docs.cipp.app), connecting it to Rallied is the fastest way to get every customer tenant ready. You'll save two big chunks of work:
* **Grant admin consent across all your tenants at once.** No more clicking **Grant admin consent** on each row in Phase 3. Per-row consent still works for any tenant CIPP can't reach.
* **Use Exchange tools without assigning the Exchange Administrator role per tenant.** The agent picks up distribution groups and shared mailboxes through CIPP automatically, so you can skip Phase 3, Step 3 for those tenants. They show **Exchange: working (cipp)** on the Companies tab.
CIPP is optional. Without it, the integration still works exactly as described in Phases 1–3 — you'll just be doing the consent and Exchange role assignment manually, one tenant at a time.
### Step 1: Get credentials from CIPP
In your CIPP instance, go to **Application Settings → API Integration → + Add Application**. Name it something like `Rallied` and give it the **admin** role.
CIPP gives you four values to copy:
* **CIPP base URL** — where your CIPP UI lives (e.g. `https://cipp-xxxxx.azurestaticapps.net`, or your custom domain)
* **Tenant ID** — your partner tenant. Find it in Entra ID → Overview if CIPP doesn't display it.
* **Application (Client) ID** — shown in CIPP's API Integration row
* **Application Secret** — shown by CIPP once, right after you create the integration
Copy the **Application Secret** right away. CIPP only shows it once. If you miss it, generate a new one in Entra ID → App registrations → \[your CIPP API app] → Certificates & secrets.
### Step 2: Paste them into Rallied
On the Microsoft 365 integration page, find the **CIPP integration** section, click **Connect**, paste in all four values, and click **Connect** again. Rallied checks the credentials with CIPP before saving — if anything's wrong, you'll see an inline error.
### Step 3: Refresh your tenants
For any customer tenant where you haven't manually assigned the Exchange Administrator role, click **Re-verify** on the row in the Companies tab. The Exchange badge flips to **working (cipp)** and the agent can now use distribution groups and shared mailboxes for that tenant — no further setup needed.
### Editing or disconnecting
Edit any field from the same section. Leave **Application Secret** blank to keep the existing one; type a new value to rotate it.
To disconnect, click **Disconnect**. Bulk consent goes away and tenants that were using CIPP for Exchange drop back to **pending** — you'll need to assign the Exchange Administrator role to them manually (Phase 3, Step 3) if you still want Exchange tools to work there. Everything else — the user, password, and group management features — keeps working exactly as before.
***
## Required Permissions Summary
| Phase | Who | Required Role |
| ---------------------------------------- | --------------------------------- | ----------------------------------------------------------------------------------- |
| 1.1–1.3 — App registration & permissions | Partner tenant admin | Application Developer (minimum), Application Administrator, or Global Administrator |
| 1.4 — Grant consent in partner tenant | Partner tenant admin | **Global Administrator** or **Privileged Role Administrator** |
| 1.5 — Partner Center Admin Agents | Partner Center admin | Partner Center admin access |
| 2 — Connect in Rallied | MSP admin in Rallied | Rallied MSP integration access |
| 3.2 — Customer admin consent | Customer admin or MSP via GDAP | **Global Administrator** of the customer tenant |
| 3.3 — Exchange role assignment | Customer admin or MSP via GDAP | **Privileged Role Administrator** of the customer tenant |
| 4 — Connect CIPP (optional) | MSP admin in Rallied + CIPP admin | Rallied MSP integration access + CIPP **admin** role on the API integration |
***
## Troubleshooting
When the app declares Microsoft Graph **application permissions**, only Global Administrator or Privileged Role Administrator can grant consent — Cloud Application Administrator and Application Administrator are insufficient.
Assigning the Exchange Administrator role in the partner tenant does **not** grant that role in customer tenants. Each customer tenant requires its own assignment.
To perform consent + role assignment via GDAP (without a customer admin), the GDAP relationship must include Global Administrator or Privileged Role Administrator. Verify your GDAP template before attempting.
Microsoft caches role permissions for 30 minutes to 2 hours after assignment. Wait and re-verify — this is expected behavior.
The display name set during app registration (Phase 1, Step 1) is what appears in role pickers across all tenants. If you can't find it, search by the Application (client) ID instead.
The secret CIPP gave you has likely expired or been rotated. Generate a fresh one in Entra ID → **App registrations → \[your CIPP API app] → Certificates & secrets**, paste it into the CIPP integration section, and click **Save changes**.
That button only appears once CIPP is connected. Scroll down to the **CIPP integration** section and connect it, or click **Connect CIPP for bulk grant** on the Companies tab to jump straight there.
CIPP itself needs to be able to manage that tenant. Check that the tenant appears in CIPP's **Tenants** list and is healthy. If CIPP can't manage it either, assign the Exchange Administrator role to the Rallied app directly (Phase 3, Step 3).
***
## Reference Links
* [Register an application](https://learn.microsoft.com/en-us/entra/identity-platform/quickstart-register-app)
* [Multi-tenant app setup](https://learn.microsoft.com/en-us/entra/identity-platform/howto-convert-app-to-be-multi-tenant)
* [Configure API access](https://learn.microsoft.com/en-us/entra/identity-platform/quickstart-configure-app-access-web-apis)
* [Admin consent endpoint](https://learn.microsoft.com/en-us/entra/identity-platform/v2-admin-consent)
* [Grant tenant-wide consent](https://learn.microsoft.com/en-us/entra/identity/enterprise-apps/grant-admin-consent)
* [User and admin consent overview](https://learn.microsoft.com/en-us/entra/identity/enterprise-apps/user-admin-consent-overview)
* [App-only auth in Exchange Online](https://learn.microsoft.com/en-us/powershell/exchange/app-only-auth-powershell-v2)
* [Application RBAC for Exchange](https://learn.microsoft.com/en-us/exchange/permissions-exo/application-rbac)
* [Assign Entra roles](https://learn.microsoft.com/en-us/entra/identity/role-based-access-control/manage-roles-portal)
* [Exchange Administrator role](https://learn.microsoft.com/en-us/entra/identity/role-based-access-control/permissions-reference#exchange-administrator)
* [GDAP introduction](https://learn.microsoft.com/en-us/partner-center/customers/gdap-introduction)
* [GDAP least-privileged roles](https://learn.microsoft.com/en-us/partner-center/customers/gdap-least-privileged-roles-by-task)
* [CIPP documentation](https://docs.cipp.app)
* [Setting up the CIPP API integration](https://docs.cipp.app/setup/api)
### Who can perform these steps
* A **Global Administrator** (or **Privileged Role Administrator**) of the customer tenant, OR
* The MSP acting via **GDAP**, if the relationship includes Global Administrator or Privileged Role Administrator
Cloud Application Administrator and Application Administrator are **not sufficient** — Microsoft restricts consent for Graph application permissions to Global Admin or PRA ([source](https://learn.microsoft.com/en-us/entra/identity/enterprise-apps/user-admin-consent-overview)).
### Step 1: Sync from Microsoft
Click **Sync** in the Companies tab to discover all customer tenants in your GDAP relationships. New tenants appear in the table with status **Pending**.
### Step 2: Grant Admin Consent
For each tenant where Consent shows **Pending**:
1. Click **Grant admin consent** on that row
2. Sign in as a Global Administrator (or PRA) of the customer tenant — or use GDAP if your relationship includes those roles
3. Approve the permissions in the Microsoft consent dialog
### Step 3: Assign the Exchange Administrator Role
For each tenant where Exchange shows **Pending**:
1. Click **Assign Exchange Admin role** on that row (opens Entra for that tenant)
2. In Entra, go to **Identity → Roles & admins**
3. Click the **Exchange Administrator** role
4. Click **Add assignment** and add the Rallied app's service principal
This step is only required if you want the agent to manage distribution groups, shared mailboxes, and mailbox permissions. Graph-only operations (user management, groups, password reset) work without it.
**Already running [CIPP](https://docs.cipp.app)?** Connect it under [Phase 4](#phase-4-optional-connect-cipp) and you can skip this step. The agent will pick up distribution groups and shared mailboxes through CIPP instead, no per-tenant role assignment needed. Those tenants show **Exchange: working (cipp)** on the Companies tab.
### Step 4: Wait for Propagation
Microsoft caches role permissions for **30 minutes to 2 hours**. Tools may return 403 during this window even when the setup is correct.
### Step 5: Re-verify
Click **Re-verify** on the row to refresh status. When both badges turn green, the tenant is ready — confirm by asking the agent to list users or distribution groups for that company.
**Done!** The tenant is fully onboarded. The agent can now manage users, groups, passwords, and mailboxes for this customer.
***
## Phase 4 (optional): Connect CIPP
If your MSP already runs [CIPP](https://docs.cipp.app), connecting it to Rallied is the fastest way to get every customer tenant ready. You'll save two big chunks of work:
* **Grant admin consent across all your tenants at once.** No more clicking **Grant admin consent** on each row in Phase 3. Per-row consent still works for any tenant CIPP can't reach.
* **Use Exchange tools without assigning the Exchange Administrator role per tenant.** The agent picks up distribution groups and shared mailboxes through CIPP automatically, so you can skip Phase 3, Step 3 for those tenants. They show **Exchange: working (cipp)** on the Companies tab.
CIPP is optional. Without it, the integration still works exactly as described in Phases 1–3 — you'll just be doing the consent and Exchange role assignment manually, one tenant at a time.
### Step 1: Get credentials from CIPP
In your CIPP instance, go to **Application Settings → API Integration → + Add Application**. Name it something like `Rallied` and give it the **admin** role.
CIPP gives you four values to copy:
* **CIPP base URL** — where your CIPP UI lives (e.g. `https://cipp-xxxxx.azurestaticapps.net`, or your custom domain)
* **Tenant ID** — your partner tenant. Find it in Entra ID → Overview if CIPP doesn't display it.
* **Application (Client) ID** — shown in CIPP's API Integration row
* **Application Secret** — shown by CIPP once, right after you create the integration
Copy the **Application Secret** right away. CIPP only shows it once. If you miss it, generate a new one in Entra ID → App registrations → \[your CIPP API app] → Certificates & secrets.
### Step 2: Paste them into Rallied
On the Microsoft 365 integration page, find the **CIPP integration** section, click **Connect**, paste in all four values, and click **Connect** again. Rallied checks the credentials with CIPP before saving — if anything's wrong, you'll see an inline error.
### Step 3: Refresh your tenants
For any customer tenant where you haven't manually assigned the Exchange Administrator role, click **Re-verify** on the row in the Companies tab. The Exchange badge flips to **working (cipp)** and the agent can now use distribution groups and shared mailboxes for that tenant — no further setup needed.
### Editing or disconnecting
Edit any field from the same section. Leave **Application Secret** blank to keep the existing one; type a new value to rotate it.
To disconnect, click **Disconnect**. Bulk consent goes away and tenants that were using CIPP for Exchange drop back to **pending** — you'll need to assign the Exchange Administrator role to them manually (Phase 3, Step 3) if you still want Exchange tools to work there. Everything else — the user, password, and group management features — keeps working exactly as before.
***
## Required Permissions Summary
| Phase | Who | Required Role |
| ---------------------------------------- | --------------------------------- | ----------------------------------------------------------------------------------- |
| 1.1–1.3 — App registration & permissions | Partner tenant admin | Application Developer (minimum), Application Administrator, or Global Administrator |
| 1.4 — Grant consent in partner tenant | Partner tenant admin | **Global Administrator** or **Privileged Role Administrator** |
| 1.5 — Partner Center Admin Agents | Partner Center admin | Partner Center admin access |
| 2 — Connect in Rallied | MSP admin in Rallied | Rallied MSP integration access |
| 3.2 — Customer admin consent | Customer admin or MSP via GDAP | **Global Administrator** of the customer tenant |
| 3.3 — Exchange role assignment | Customer admin or MSP via GDAP | **Privileged Role Administrator** of the customer tenant |
| 4 — Connect CIPP (optional) | MSP admin in Rallied + CIPP admin | Rallied MSP integration access + CIPP **admin** role on the API integration |
***
## Troubleshooting
When the app declares Microsoft Graph **application permissions**, only Global Administrator or Privileged Role Administrator can grant consent — Cloud Application Administrator and Application Administrator are insufficient.
Assigning the Exchange Administrator role in the partner tenant does **not** grant that role in customer tenants. Each customer tenant requires its own assignment.
To perform consent + role assignment via GDAP (without a customer admin), the GDAP relationship must include Global Administrator or Privileged Role Administrator. Verify your GDAP template before attempting.
Microsoft caches role permissions for 30 minutes to 2 hours after assignment. Wait and re-verify — this is expected behavior.
The display name set during app registration (Phase 1, Step 1) is what appears in role pickers across all tenants. If you can't find it, search by the Application (client) ID instead.
The secret CIPP gave you has likely expired or been rotated. Generate a fresh one in Entra ID → **App registrations → \[your CIPP API app] → Certificates & secrets**, paste it into the CIPP integration section, and click **Save changes**.
That button only appears once CIPP is connected. Scroll down to the **CIPP integration** section and connect it, or click **Connect CIPP for bulk grant** on the Companies tab to jump straight there.
CIPP itself needs to be able to manage that tenant. Check that the tenant appears in CIPP's **Tenants** list and is healthy. If CIPP can't manage it either, assign the Exchange Administrator role to the Rallied app directly (Phase 3, Step 3).
***
## Reference Links
* [Register an application](https://learn.microsoft.com/en-us/entra/identity-platform/quickstart-register-app)
* [Multi-tenant app setup](https://learn.microsoft.com/en-us/entra/identity-platform/howto-convert-app-to-be-multi-tenant)
* [Configure API access](https://learn.microsoft.com/en-us/entra/identity-platform/quickstart-configure-app-access-web-apis)
* [Admin consent endpoint](https://learn.microsoft.com/en-us/entra/identity-platform/v2-admin-consent)
* [Grant tenant-wide consent](https://learn.microsoft.com/en-us/entra/identity/enterprise-apps/grant-admin-consent)
* [User and admin consent overview](https://learn.microsoft.com/en-us/entra/identity/enterprise-apps/user-admin-consent-overview)
* [App-only auth in Exchange Online](https://learn.microsoft.com/en-us/powershell/exchange/app-only-auth-powershell-v2)
* [Application RBAC for Exchange](https://learn.microsoft.com/en-us/exchange/permissions-exo/application-rbac)
* [Assign Entra roles](https://learn.microsoft.com/en-us/entra/identity/role-based-access-control/manage-roles-portal)
* [Exchange Administrator role](https://learn.microsoft.com/en-us/entra/identity/role-based-access-control/permissions-reference#exchange-administrator)
* [GDAP introduction](https://learn.microsoft.com/en-us/partner-center/customers/gdap-introduction)
* [GDAP least-privileged roles](https://learn.microsoft.com/en-us/partner-center/customers/gdap-least-privileged-roles-by-task)
* [CIPP documentation](https://docs.cipp.app)
* [Setting up the CIPP API integration](https://docs.cipp.app/setup/api)