
Find workflows under Workflows in the sidebar (used across all your clients), or on the Workflows tab of a single client (used only for that client).
How workflows apply to tickets
Every time a new ticket comes in, the agent looks at your active workflows and picks the ones whose triggers describe the ticket. It follows those steps as its plan. If nothing matches, the agent works the ticket the way it normally would. A few things to keep in mind:- More than one workflow can apply to the same ticket. The agent considers every workflow that matches, whether it’s shared or client-specific.
- Matched steps are the plan, not a suggestion. The agent follows them as written rather than improvising. If a step is wrong, edit the workflow.
- The agent matches on the trigger, not the steps. A vague trigger means missed matches; a too-broad one means the workflow runs on tickets it wasn’t meant for.
- Only active workflows are used. Drafts and archived workflows are ignored.
Workflows for all clients vs. a single client
You can create a workflow that applies to every client you support, or one that only applies to a single client.
Start with shared workflows for anything that’s true across your clients, like onboarding, password resets, and ticket triage. Add a client-specific workflow when one customer’s setup needs a different sequence, like an offboarding flow that reclaims a non-standard SaaS license.
Once a workflow has been turned on, you can’t move it between MSP-wide and a single client. Create a new workflow in the other place instead.
Creating a workflow
You need permission to manage workflows. The built-in MSP Admin role has it; MSP Technicians can view workflows but not change them. From the Workflows page, click New workflow. You can describe the workflow in your own words or start from a template. Either way, Rallied creates a draft and opens it in the editor.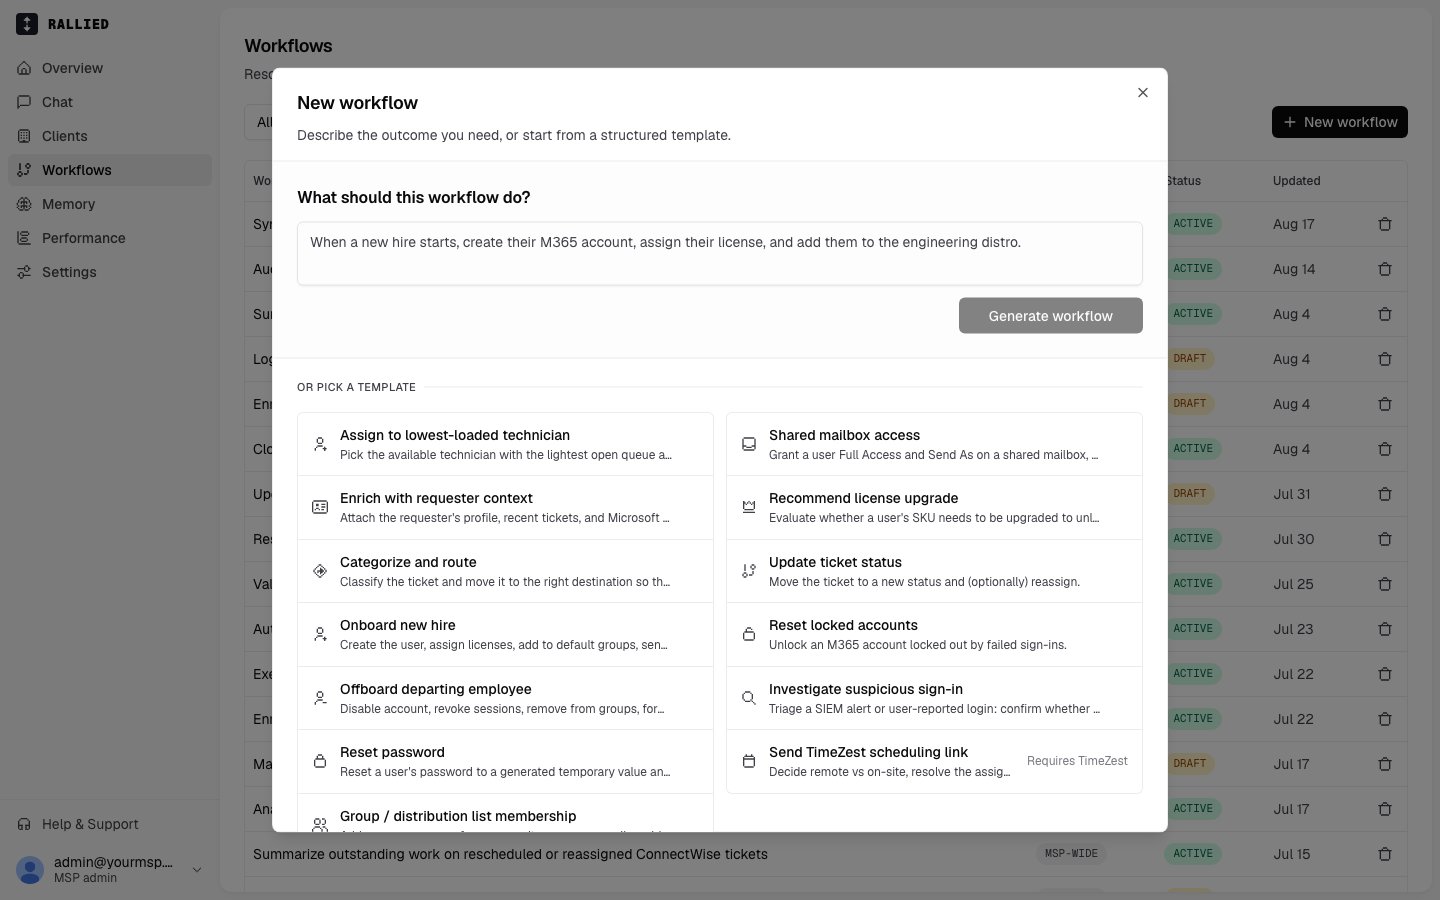
Describe it in your own words
Under What should this workflow do?, describe what kind of ticket it’s for and what the agent should do about it. Click Generate workflow. Rallied matches your description to the tools you’ve connected and builds a trigger and steps for you to review in the editor. Examples that work well:- “When a new hire starts, create their Microsoft 365 account, assign their license, and add them to the engineering distribution list.”
- “When a ticket reports a stuck print job, restart the printer’s print spooler service and add an internal note with the result.”
- “When a security alert ticket comes in about a suspicious sign-in, check the user’s recent sign-in activity, decide whether it’s benign, suspicious, or compromised, and post the verdict as an internal note.”
Start from a template
Under Or pick a template, click a template. Each one comes with a trigger and steps already written, so you get a working draft right away. Templates cover the most common kinds of tickets:
Templates work across ConnectWise, HaloPSA, and Autotask. The agent uses whichever ticketing system you’ve connected.
If a template needs an integration you haven’t connected yet, it shows a Requires hint, like Requires TimeZest. Connect that integration in Settings → Integrations so the workflow’s tools are available.
If you haven’t connected anything yet
You can’t create a workflow until you connect at least one integration; the agent needs tools to work with. Click Go to integrations in the dialog. Connect Microsoft 365 to unlock the user-lifecycle templates, or ConnectWise, HaloPSA, or Autotask to unlock the ticket templates.Editing a workflow
Click any workflow in the list to open the editor. The steps are on the right, and a chat with Rallied is on the left.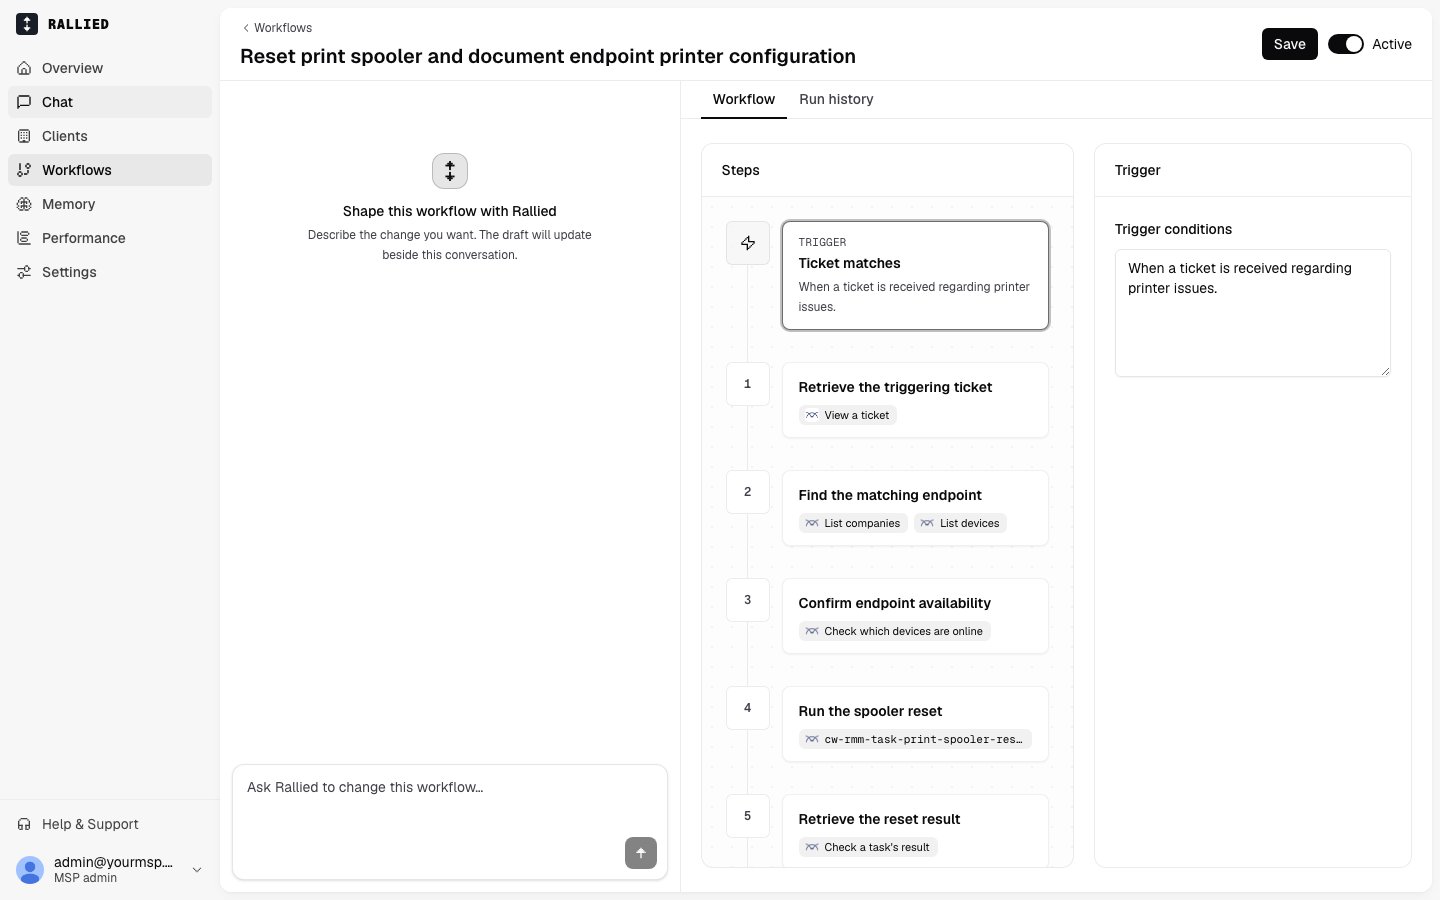
- Title: click the name at the top to rename the workflow.
- Trigger: click the Trigger card and fill in Trigger conditions. Keep it to one line (280 characters at most).
- Steps: click a step to edit it. Click Add next step at the bottom of the list to add one.
Editing a step
Each step has a title, instructions, and tools. Use the arrows at the top of the panel to reorder the step, or the trash icon to remove it.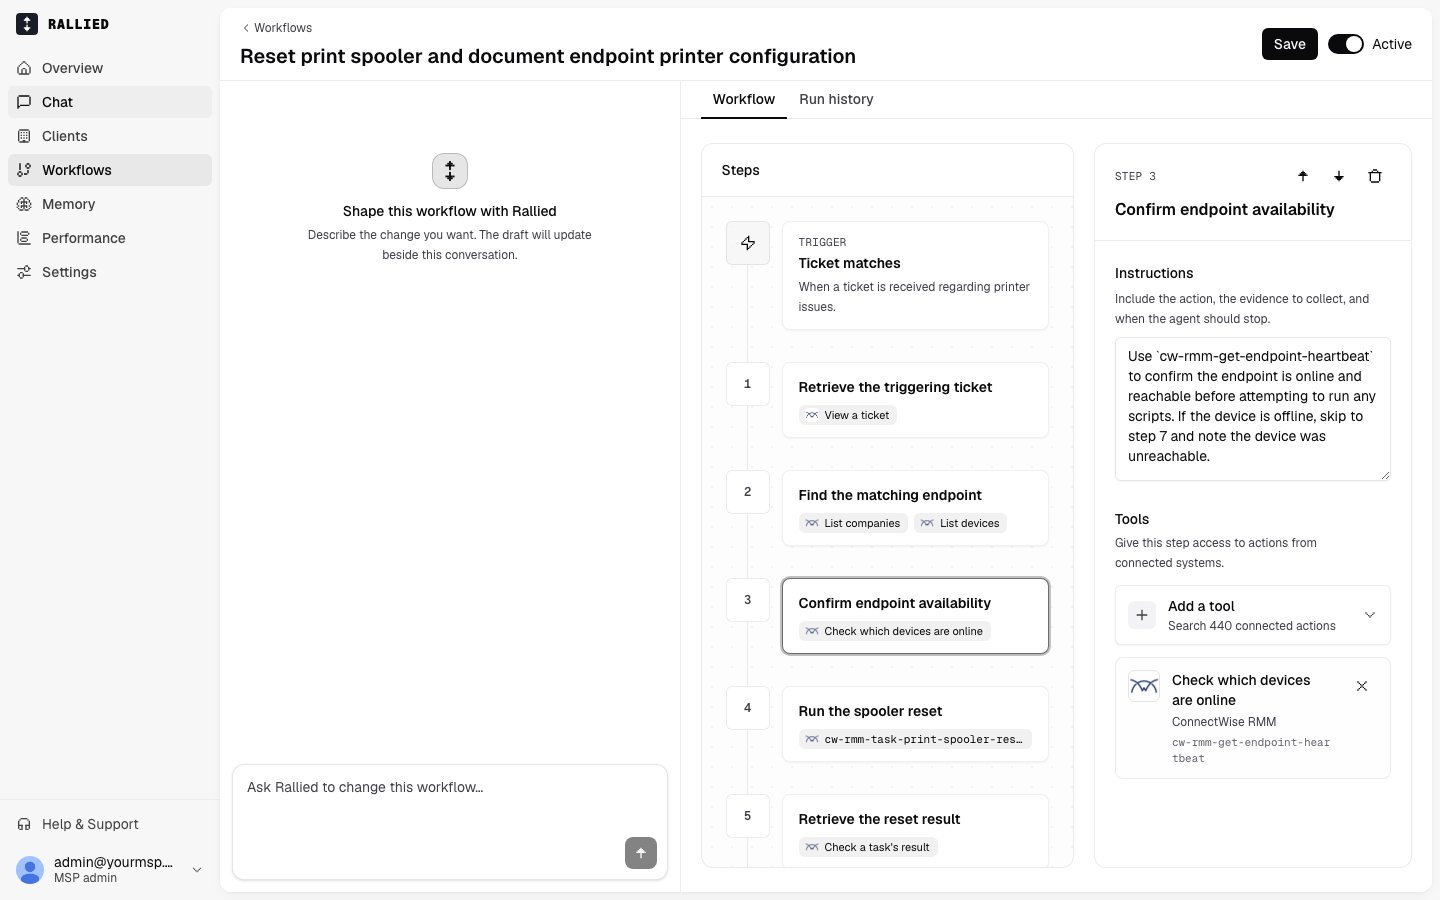
- Title: a short label, 60 characters at most. Put the detail in the instructions.
- Instructions: include the action, the evidence to collect, and when the agent should stop.
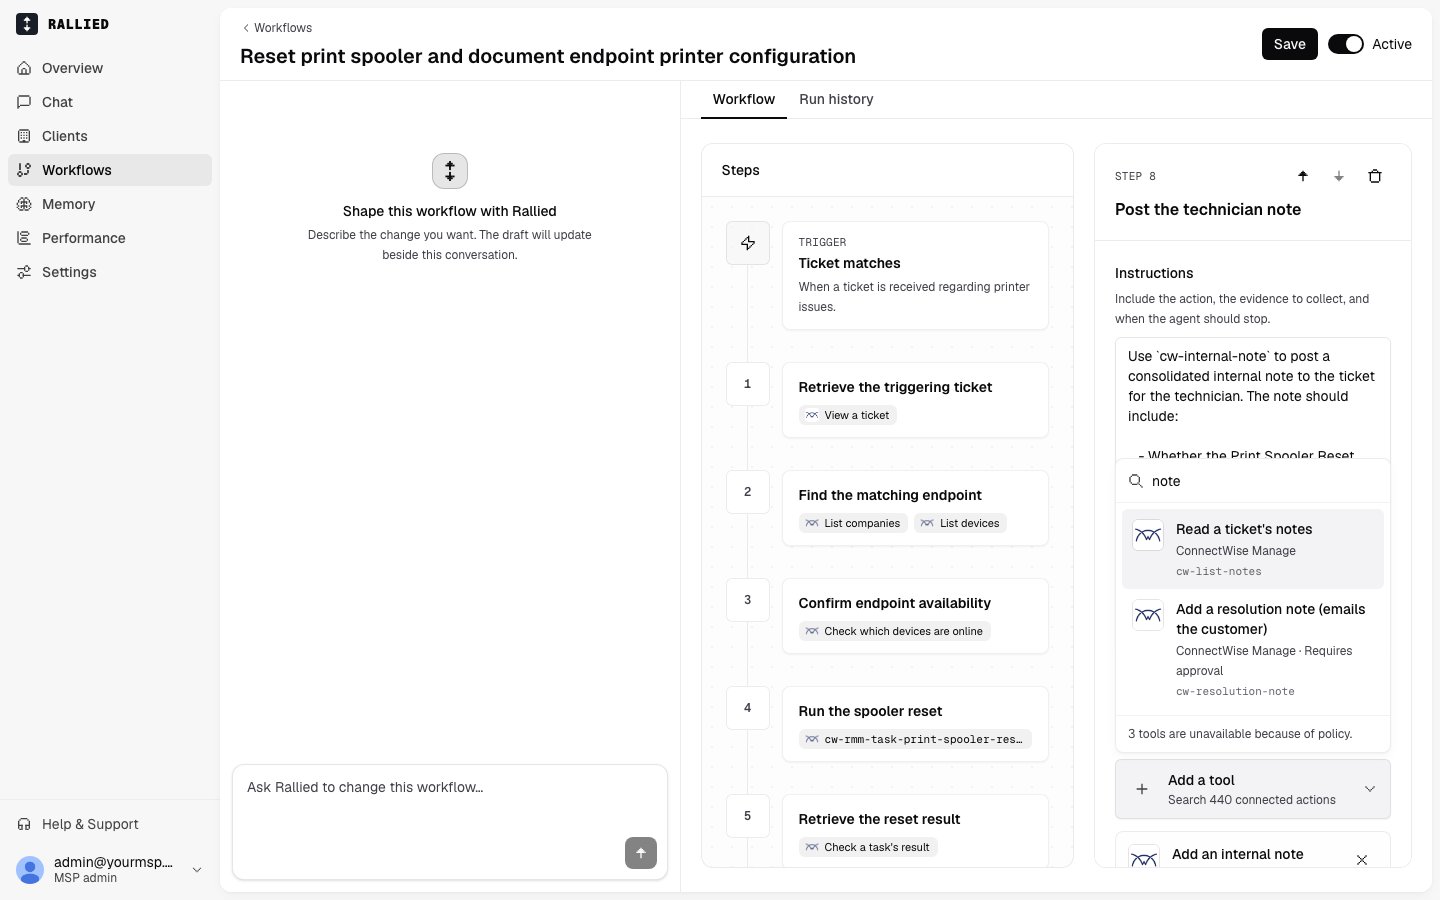
- Tools: the actions this step can use from your connected systems.
Changing a workflow with chat
Type what you want changed in Ask Rallied to change this workflow…, like “add a step that emails the requester when the reset is done.” Rallied updates the steps beside the conversation and marks changed cards as Updated. Review the changes, then save. Chat is unavailable while you have unsaved edits. Save or discard your inline changes first.Saving and turning a workflow on
Edits aren’t saved automatically. Click Save when you’re done.- Draft workflow: Save keeps your changes as a draft. Turn on the Active switch to start using it on tickets.
- Active workflow: Save publishes your changes right away. The agent uses them on the next matching ticket.
Writing a good trigger
The trigger matters more than anything else on a workflow. The agent decides which workflows to use based on the trigger alone, so a sloppy trigger leads to either missed matches or workflows firing on the wrong tickets. Tips for writing a good trigger:- Start with when, and describe the situation, not the action. “When an offboarding request comes in for a departing employee” is better than “Offboard the user”.
- Name the kind of ticket or signal you’re looking for, like a request, an alert, or a status change.
- Stick to what kind of ticket this is. Leave the how for the steps.
Workflows created before steps
Workflows written as a single block of instructions are converted into steps the first time you open them. Each numbered line becomes a step. Nothing changes for the agent until you save. If a workflow can’t be converted, the editor shows the original text read-only with the reason, like an integration that isn’t connected or instructions with no numbered steps. Fix the reason given, like connecting the integration, to edit it. You can still turn it on or off.Workflow status
- Draft
- Active
- Archived
The workflow exists but the agent doesn’t use it yet. Drafts are for composing, editing, and reviewing before going live.
Seeing which tickets used a workflow
Open the workflow and click the Run history tab. It lists the tickets where the agent ran at least one step of that workflow.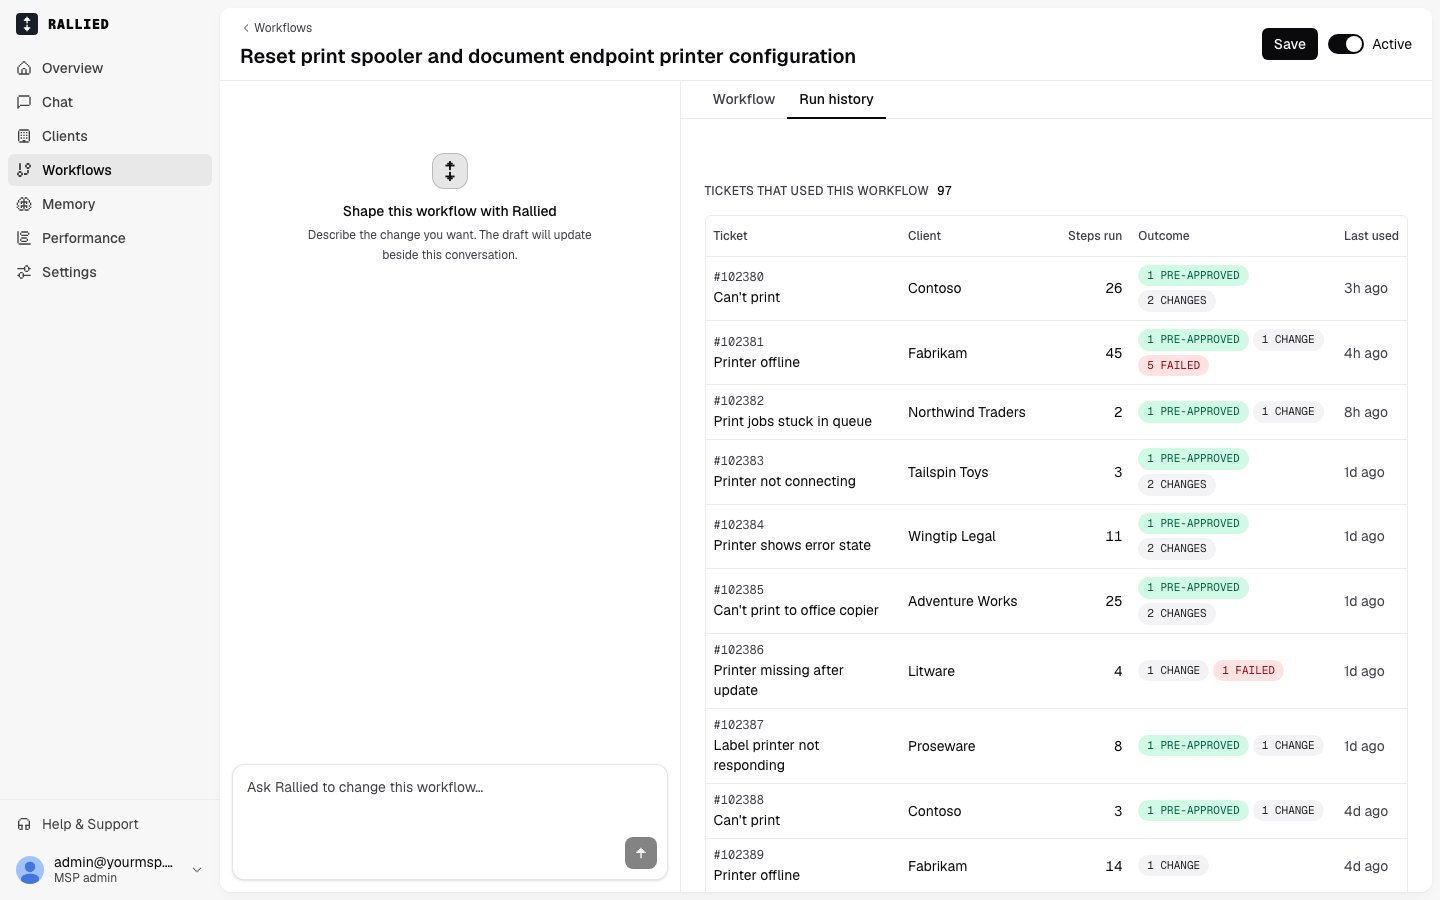
Deleting a workflow
From the list, click the trash icon on the row and click Delete.Tips
- Start with a template. They’re a faster, cleaner starting point than a blank page.
- Turn workflows on one at a time. That way if the agent’s behavior changes, you know which workflow caused it.
- Watch the first few tickets after activating. Check Run history, then open a few tickets in Activity and skim the agent’s plan. If the trigger caught the wrong tickets, tighten it; if a step got skipped, edit the instructions.
- Don’t go overboard with client-specific workflows. They’re useful when a single client genuinely needs a different sequence, but a pile of one-off client workflows is harder to maintain than a single well-written shared one.
Related
- Prompts — standing instructions that apply to every ticket.
- Memory — corrections the agent learned on its own, which often point to a missing workflow.
- Activity — check what the agent did on the first tickets a workflow matched.
- Integrations — the tools a workflow’s steps can use.
- Approval settings — which tools need a technician’s sign-off outside a workflow.